|
up bow, down bow
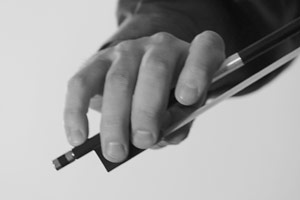
Parts of the bow are the tip (or point), stick (wood of the
bow), frog (lower portion where you hold the bow) and screw
(where you tighten and loosen the bow.)
A bow that begins in a downward motion is called a "downbow"
(notated in music with this symbol: " "),
and the opposite is called an "upbow" (notated in music as a " "),
and the opposite is called an "upbow" (notated in music as a " ".) ".)
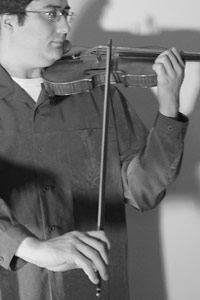
Common places to begin in the bow are at the tip or point, in
the middle of the bow (about half way down) and at the frog
(near your hand.) Also, sometimes we'll say begin in the upper
half or lower half.
|

|
bow pressure & speed
Experiment with bow pressure and speed, combinations of these
two things can create all sorts of different sound, heavy,
light, scratchy, glassy: the more length and speed you use will
create a glassy sound, if you apply more pressure, the sound
becomes richer. With less length and speed the sound develops a
rougher texture (especially if there is heavy pressure), in
general, if you're getting a squeaky sound, try using more bow
length and vary the pressure until you have something you like.
|
|
some bow exercises
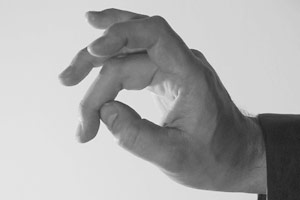
Practice re-making the bow hold over and over. Emphasize good
placement of the fingers, stop and shake out the right hand and
start again. Do this several times until the action becomes
almost second nature. Then “remember the feel” of the bow hold.
Close your eyes and try to construct the bow hold from touch
(while you hold the stick of the bow.) Open eyes and review:
“Was the thumb tip on the stick between the leather and the
stock?”
“Rounded pinkie?”
“Some spacing of the fingers, not bunched up?”
“First finger on stick between 1st & 2nd joints?”
“Can you imagine an egg cupped in your hand (from the roundness
of the hand)?”
Ready...Go! Now for the speed round. Try forming the
bow hold from touch with eyes closed as quickly as possible,
when done, you may open eyes. Let the memorization happen with
self review.
Bow Exercises
Windshield Wipers: make a bow hold and then make back and
forth large arcs with the tip of the bow. Try to resist the
impulse to do this fast. Smooth and steady. Feel the weight of
the bow in each of the fingers as it moves from one side to the
other.
Elevators: in this exercise, the bow is kept flat from the
low bottom floor, to the very top floor. Pretend there are
people on the bow and they mustn’t fall off. Again, move slowly
in a relaxed fashion. If nerves make the tip boggle, stop, shake
out the hand and try lifting the bow while breathing in, and
exhaling while the bow descends.

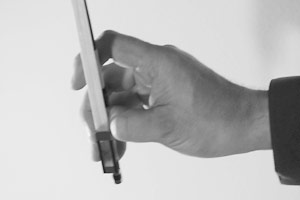
Space Needles: pointing the tip of the bow straight up, move
the bow slowly up in a straight line. As with the elevator, this
exercise requires that the wrist be flexible. Begin from the
lowest point possible (without bending legs) and raise bow to
highest point, always keeping the bow straight up and down.
|
|
|
bow hold
In beginning violin & viola, the thumb is placed at the frog
just outside and resting next to the curl in the hair holder,
opposite the 2nd & 3rd fingers and diagonal to the stock. The
index finger touches the stick between the 1st & 2nd joints. The
little finger rests somewhere on the stick of the bow on the
pinky tip. Notice the curved nature of the hand in relation to
the bow, all fingers work together to hold the bow with as
little stress to individual fingers as possible. The pinkie
should be curved, not straight.
As students become more familiar with the bow hold, a helper
may be able to lightly pick up any finger (except the thumb)
without one loosing the bow—so integrated is the nature of
fingers working together.
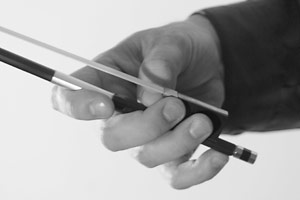
Center of bow hold, thumb & middle finger
Forward slant of the fingers
Bent thumb, first (pointing) finger between first and second
joints
Pinky curled, round, cupped (or shell) shape of the hand, as
if you could hold an egg
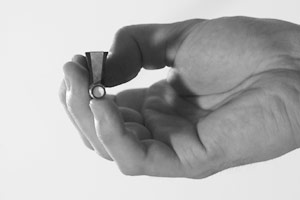
"Hole" made by roundness of the hand
Bow at the frog, slight upward bend of the wrist to keep the
bow straight
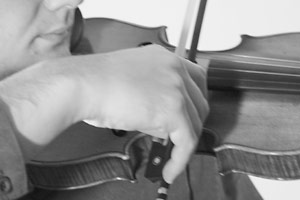
Bow at the tip, wrist downward to keep bow straight
|
|