GETTING STARTED
Work on memorization skills by learning parts of the instrument! Many parts of the instrument are named after the body. Start with going through the names a few times then testing on the parts: “What is this?” The parts of the bow should be learned too! Tip: use the real violin/viola—not the drawing.
Also the names of the strings on your violin are: "Good Dogs Always Eat" G D A E from low to high. On the viola, your strings are C G D A, let me know if you come up with a good phrase to memorize that one and I'll put it here in the site!
instrument care
From the aging of the wood to the skills needed to make a string instrument, you can assume that any string instrument took years to complete. The making of string instruments perhaps involves the most craftsman-like skills of all instruments and they should be treated with utmost care.
Rosin dust that accumulates on the violin/viola needs to be wiped with a clean, cotton cloth after every session. This cloth can be kept with the instrument in the case. The bow should be loosened so that the hairs are just off the stick after playing. This can be adjusted with the screw at the frog of the bow. When playing, the bow needs to be re-tightened so that there is some tension in the hairs, but not so tight as to cause the stick to be straight or curved away from the hairs. Over-tightening can ruin or break a bow!
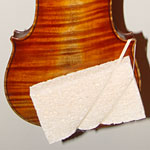
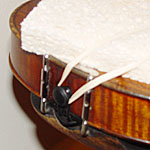
A cover for the instrument will help prevent damage to the instrument in the case from the bow coming loose from its holder. A pillow case works nicely for this, simply insert the instrument and tuck into the case.
Cleaning the instrument and bow stick should be done periodically with a special cleaner sold at violin shops. Never ever use a common household cleaner! Chemicals not designed for the fine varnish of the violin/viola can seriously and permanently damage the varnish. Store cleaners away from the instrument (don’t keep these bottles in the case.)
There are differing schools of thought on rosining the bow. What it boils down to is a matter of preference. Rosin the bow when the lack of it seems to be negatively affecting the sound (glassy sounding or generally slippery feeling.) It isn’t always necessary to rosin before every session—except with some bows that have synthetic hairs. Rosin with a gentle but firm motion, the whole length of the bow. Try to avoid the impulse to over rosin certain areas of the bow, it is better to have a consistently rosined bow.
shoulder pads
Shoulder pads need to be of the correct size and thickness to be comfortable. Pads can be attached to the back of the instrument with rubber bands. Sponges work well and don’t slip off the instrument. Fabric stores sell foam padding which is excellent for this application. Here’s where it gets a little tricky: the pad needs to be of the right thickness for your neck. The pad should bring up the chin rest to just below natural chin level. Usually the 3/4” to 1.5” thick type foam pad works well for most.
Also consider the “give” of the material. If it is stiff, it won’t adapt itself as well to the shoulder. If it is too squishy, it won’t provide support.
Pads should be placed (looking at the back of the instrument) in the lower right, right/center region (under the chinrest, generally.) Play with different shapes of pads and various placements to find the ideal spot. A rubber band can hold the padding to the violin:

Be sure and remove your pad before putting your violin away in its case, and store the pad where it is not going to create pressure on the instrument (usually somewhere around the scroll or point of the case is good to store the pad.)
If you find that your chin rest is uncomfortable against your neck, cutting in, try draping a cloth over the chinrest and over the end then placing it on your shoulder.
Those of you who saw my pad and are interested in getting one: it's made by "Kun", I believe they only have one style of violin shoulder rest and last time I bought one, it was about $30-35 at a music store. On eBay, they appear to be $8-20. Listed, there are Kun "Style" rests and actual Kun rests, I'd recommend getting the real thing, not an imitation, also, try to get one with the feet that detach, these are easier to store in the case.
setting up your music studio
 When
setting up to practice, it's important that the top of your music be
level with your eyes. If you get a music stand, make sure that it goes
up high enough to accomplish this, it'll help you in not straining or
going out of position just to read music. Also, a full-length mirror is
very helpful in giving you feedback on your arm positions, violin level,
finger positions and bow movement. Note the angle between the music
stand and mirror, and that the violin is more or less parallel with the
mirror. When practicing, in general, point the scroll of the violin at
the left edge of your music.
When
setting up to practice, it's important that the top of your music be
level with your eyes. If you get a music stand, make sure that it goes
up high enough to accomplish this, it'll help you in not straining or
going out of position just to read music. Also, a full-length mirror is
very helpful in giving you feedback on your arm positions, violin level,
finger positions and bow movement. Note the angle between the music
stand and mirror, and that the violin is more or less parallel with the
mirror. When practicing, in general, point the scroll of the violin at
the left edge of your music.
About practicing in New York City: Paper thin walls and neighbors that make Godzilla look like Barney.... If you're finding that you're encountering problems practicing, or that the only time you have to practice is late at night, you may wish to purchase a "practice mute". Though it's not recommended to practice regularly with a mute, a practice mute may be the only solution in tight quarters when surrounded by neighbors who may be, perhaps, striving to become better supporters of the arts.
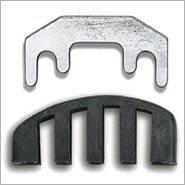 Practice
mutes are made of thick, heavy rubber or metal and slip on the bridge
deadening the sound of the instrument greatly. There are two types of
mutes, a performance mute and a practice mute, the
performance mute only softens the sound a little bit, so make sure you
don't accidentally purchase that one if volume is truly a concern.
Practice
mutes are made of thick, heavy rubber or metal and slip on the bridge
deadening the sound of the instrument greatly. There are two types of
mutes, a performance mute and a practice mute, the
performance mute only softens the sound a little bit, so make sure you
don't accidentally purchase that one if volume is truly a concern.
When mounting the metal mute (in particular), do take care to hold your violin at a steep angle or upside down so that the mute does not accidentally fall straight onto the face of your instrument if it slips out of your control, it's very heavy and will damage your violin if dropped on it.